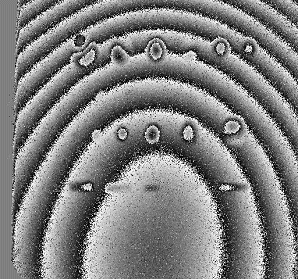
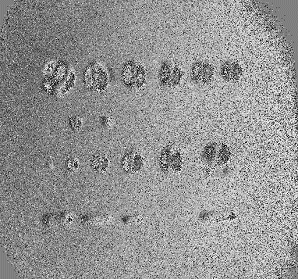
The K100/HOL optical head using the HoloFringe300 interferometry program allows identification of bonding flaws in real-time, using electronic holography. The K100/SHR optics package performs this function through electronic shearography. Flaws that can be excited into random vibration show up as dark regions in a hologram. These flaws can be sized and labeled by the operator using on-screen calipers tools. Flaws that show up as deformation due to pressure or thermal stressing are easily evaluated with the real-time phase imaging fringes. Holographic or shearographic inspection is quick, sure, and reliable.


Bonding Flaw Inspection with Holography and Shearography. The object here is a ceramic plate with a layer of plastic bonded to it by a double-sided adhesive layer. Flaws were cut in the adhesive layer to generate disbonds of various sizes and shapes. A thermal stress was applied to the structure to generate deformation of the plastic where it was not bonded to the ceramic. Vacuum stressing could also be used, and, for materials that conduct sound well, ultrasonic noise can cause flaws to vibrate. The image on the left shows the flaws as revealed by holographic fringes. They appear as perturbations of the overall elliptical fringe pattern due to thermal deformation. The image on the right shows the flaws as revealed by shearography. The overall deformation fringes are not evident because the fringes here indicate values of constant slope. Shearography is more vibration tolerant but requires more laser light.